All You Need To Know About Creating A Travel Blog
If you’re looking to create a travel blog in 2025 that can evolve into a business, a full-time career, or a creative outlet to connect with like-minded individuals, the strategies in this post will help you get started on your journey. Whether you have an established blog seeking better SEO skills for building a larger audience or are just starting from scratch, here are my essential beginner blogging tips for getting started on your travel blog.
If you’ve already started creating a travel blog, check out how to make your blog the best and really stand out!
Quick Links
Disclaimer: This blog contains affiliate links. If you purchase any cool products or experiences through these links, I may earn a little something as a thank you. There is no extra cost to you, promise!
STEP 1: ESTABLISH YOUR AUDIENCE
Before kicking off your travel blog, it’s crucial to identify your potential audience. You might ask yourself, ‘Who will read my travel blog?’
Many bloggers start out for fun, and their hobby eventually turns into a business—great! However, if your goal is to create a travel blog with business potential from the beginning, you’ll need a solid plan before you start.
When beginning a travel blog, it’s essential to consider your audience. Write for yourself, but always consider your readers. If you do this right, you’ll create great content from day one.
I mix helpful guides and travel tips for my audience with aesthetic-driven content and personal recommendations, like this blog. I strive to stand out by prioritizing quality content, including a better reading experience for readers, like minimal adverts (instead of the typical hefty 30 ads on a blog, I would do maybe 5 to 10 depending on blog length – less money for me but better user experience for you) and visually appealing content. Ultimately, my audience knows they can consistently expect this from me.
STEP 2: BEGIN YOUR TRAVEL BLOG JOURNEY
Now, let the work begin. Here’s a step-by-step process for beginning your travel blog:
1. Pick A Name For Your Travel Blog
Choose a name that can grow with you. Naming your travel website ‘3 Months In Japan’ might not be relevant a year from now. Your blog’s name is part of your brand, and you’ll likely keep it for its entire lifespan. Aim for something flexible and memorable. After sitting on several names at the beginning of my blogging journey, I finally decided on Forever Living Yes. I love that its acronyms are FLY (which is incredible as a travel blog) and overall reflect a positive vibe, with YES being the key to living your best life. It’s something I can expand on regarding branding going forward, and it’s pretty memorable.
TIPS FOR YOUR TRAVEL BLOG
Once you’ve brainstormed name ideas, check if the domain (your website’s URL) and social media handles are available.
Despite this advice, remember that sometimes a super niche brand can be great for SEO. For example, ‘1 Month In Jamaica’ could take off faster if it focuses solely on Jamaica. Consider how personally connected you want your blog to be for your targeted audience.
While a name is important, your voice is what truly matters. Branding is multi-layered—the name is just the start. Don’t stress too much about finding the perfect name; just find a name you’re happy with and can work with. The worst mistake is delaying your travel blog because of it. Just get started! Procrastination and being overly fussy delay progress. If you’re stuck, why not use your name? Remember, YOU are a personal brand too!
2. Domain & Web Hosting
If this is your first time considering a website, you must learn some key terms. Domain and hosting are two of them. Sometimes, they are sold as a pair (which is pretty handy) but are very different—but you need both to start your travel blog.
DOMAIN
Domain: A domain is your website’s URL. For example, my domain is ForeverLivingYes.Com. To claim your domain, you’ll need to pay an annual fee.
WEB HOSTING
Web Hosting: With web hosting, you’re practically renting space on the Internet where your website will live. For example, I host my website with GoDaddy and pay an annual hosting fee. They offer 24/7 help with easy step-by-step registration and additional perks for you to add on, depending on what you want for your website.
3. Set Up Your Blog On WordPress
After your domain and web hosting are set up, it’s time to start your travel blog! WordPress.org is the popular choice among writers in the blogging block—it’s what I swear by and suggest. Just make sure you choose WordPress.org over WordPress.com because, with .org, you can host your site yourself, whereas with .com, you won’t be able to. WordPress is free to use and has countless themes and plugins for customisation.
If you sign up with GoDaddy, you can set up WordPress from there. WordPress provides resources—video tutorials and blogs—to help you get started. It takes a little learning and patience, but it’s well worth it. Once you’ve checked it out, you can begin building your site. You’ll first start by picking a theme.
There are many great free themes; start by choosing one and playing around with it to see if it suits your style. I actually played around with mine for a few months but needed a paid theme to enable more flexibility with what I could do, with extra pre-made templates, which I found so useful! I used Blossom Theme Pro, which just made my life soooo much easier! With excellent step-by-step tutorials, I can confirm this was my best game-changer purchase for my travel blog.
PLAY AROUND & GET FAMILIAR WITH THE FOLLOWING:
4. Set Up Google Analytics
Once you’ve become familiar with everything, it’s time to set up Google Analytics. What is Google Analytics? It’s like your site’s personal detective—giving you the lowdown on your visitors and spilling all the juicy details. Want to know how many people check out your site, how long they hang out on each page, where they’re from, their age range, and more? It’s basically your backstage pass to understanding your audience!
You can get a Google Site Kit tool on WordPress, giving you easy access to key figures about your site. This will become more important when you start publishing to understand how your content is doing.
STEP 3: THE FUN PART – CUSTOMIZING YOUR TRAVEL BLOG
This is where the fun starts; don’t worry about getting it perfect the first time – as you go along, you’ll adjust and tweak, even when you’ve become a pro.
1. Themes & Branding
The first thing you will customize is your theme. You have thousands of themes, typically priced between £20 and £70. While there are free options, splurging on a premium theme is worth it. It’s a small investment for a slick site that’ll evolve beautifully with your journey! As mentioned, I opted for Blossoms Theme Pro and have never looked back! So, before you pick your first theme, think about your long-term branding!
BRANDING TIPS
It might help to create a mood board that reflects the vibes and style of what you want your website to portray and achieve. Then, you should choose a theme that reflects that.
Once you’ve purchased a theme, the next step is to install it on your site. Themes typically come with installation instructions, but here’s a quick rundown of what you’ll generally need to do:
2. Logo & Designs
Now, it’s time to create your logo. Some WordPress themes have a built-in ‘logo’ feature, which can display your blog name in the header. This can work well when you’re starting. If you’re considering a custom logo or graphics for your blog, there are a few ways to approach it.
One option is to learn the basics of Adobe Photoshop and create your logo and graphics using your brand colours and fonts. However, this can be time-consuming, especially for beginners. For those just starting, I recommend Canva, an excellent tool for designing brand elements and graphics! Canva Pro offers thousands of templates, stock photos, and ready-made graphics that are easy to customize, many of which are free.
Alternatively, some websites help you generate the perfect logo. I purchased my logo via Looka, which gives you access to vector files, PDFs, and web formats that are easy to upload on your website. Fiverr is also an amazing place to find top-notch freelancers to design you a logo at affordable prices. You can pay per job. There are many good creatives on there (go with trusted reviews) whenever you need help with anything along the way.
3. User Experience
Have you got your theme up and running? Awesome! Now, let’s make your travel blog super easy to use. The fancy term for how people navigate your site is ‘user experience’. Some themes include an integrated user-friendly version. This means the content adapts depending on whether visitors view it from a computer, tablet, or phone. For example, the formats are different if you look at my website on a computer or mobile.
If you need help deciding how you want different devices to display your content, peek at your favourite websites. How do they organize everything on a computer vs mobile? Are there drop-down menus or top content right on the homepage? Take notes on what you like.
Don’t stress about every little detail—start with a clean, fresh look that’s easy to get around. You can always tweak things as you add more content. This, for me, is the hardest part. I want my content to be perfect on both laptop and mobile, so I spend hours and hours back and forth. As time has passed, I’ve got quicker at knowing my formats, how I wanted my travel blog to look, and how I want to structure my posts. This will ease with time; try not to stress!
WHAT TO FOCUS ON
Setting Up Your Menu Bar: First things first, sort out your menu bar so readers can find what they need fast. In your Dashboard, go to Appearance > Menus to customize it. It might be a bit tricky initially, so a tutorial can help!
Mapping Out Your Homepage: It may help to sketch your homepage layout on paper first. Think about the design and what you want people to see first when they come to your site, and make it clear what your website is about. Once it makes sense to you, start building the homepage on WordPress.
Think about user experience as you tweak your site’s design. Then, use plugins to boost performance and further customize your blog!
4. Essential Plugins For Your Travel Blog
WordPress comes equipped with free, user-friendly plugins such as Yoast SEO, which aids in optimizing your website and blog posts for Google Search, and Askimet, which is designed to handle spam comments. Since no single WordPress theme covers everything, you may need plugins for additional customization, such as image sliders and social sharing icons.
Again, see what you’d like to add to your site. Many of my plugins have been added along my blogging journey. Although officially launched in 2024, I have been working on my website since 2022. I am still adding plugins where I see fit, so just enjoy the process and adapt.
CHECK OUT THESE PLUGINS
Plugins are fantastic, but don’t go overboard! Too many can slow down your site, hurting your Google rankings. So, choose wisely!
STEP 4: IT’S TIME TO CREATE CONTENT!
You got a lot out the way; now it’s time to do your thing!
1. Set Up Your Main Pages
Once you’ve set up your theme and plugins, it’s time to create your main pages and blog posts. Here’s how to do it:
Create a New Page: Go to your WordPress Dashboard’s left sidebar and click Pages > Add New.
Create a New Post: Go to Posts > Add New for blog posts.

PAGE VS POSTS
MUST-HAVE PAGES
As your site grows, you might want to add more pages to highlight your top content. Remember, setting up your pages is just the start. You can always tweak and add more as your site evolves!
2. The Importance Of Learning SEO
Before you dive into writing, get cosy with SEO (Search Engine Optimization) and keyword research. Trust me, you’ll save so much time later by making your posts SEO-friendly from the beginning (speaking from experience here!). It’s super important that your posts integrate SEO techniques to give your website the best chance of success. Plus, you want people to find your excellent content on Google from the start, which will only happen with good SEO.
Now, it’s not easy to wrap your head around, but you need the basics when starting. The AIOSEO plugin helps so much when writing your post, as you’ll see prompts to help your blog posts reach their SEO levels. You can learn more in-depth about SEO from many blogs, including Yoast Blog, which is super helpful in explaining in-depth SEO.
3. Planning Content For Your Travel Blog
Planning content is not as straightforward as it seems, but it’s handy for helping you stay organized. While you’re getting the hang of SEO, set up a content schedule. Find a rhythm that works for you and stick to it. Consistency could mean posting once a week or once daily, depending on your goals and how long it takes to create high-quality content.
I used to post whenever I felt like it, but over time, it wasn’t really working for me—it’s great if there’s some sort of consistency. So now, I plan to post twice a week on my website, with three days focused on social media content. It helps to have content in advance (two weeks is good) so you’re not scrambling for content on the day—a feeling I know too well, which doesn’t work in the long run.
Think of it this way: You want to give people a reason to return, and when they do, there should be something new for them to read. Otherwise, they might not return.
4. Creating Pillar Content For Your Travel Blog
Here’s an essential part of content strategy: Focus on 2-3 main categories and create lots of content for each. This is known as cluster topics and is an excellent form of SEO building, with it all interlinking to your main content. Once you’ve got a solid foundation, you can expand from there. It’s all about making it flow.
For instance, your categories could be specific destinations, regions, or types of travel. Maybe you’ll start with Solo Travel, European Travel, or the Asia Continent, or perhaps solo travel, Couples Trips, or Hotels. For example, on my destinations page, my sub-categories are continents: Africa, Asia, Europe, Central America, etc.
Aim to build three to five pieces of content for each category before branching out further. This way, when someone visits your site for any of those interests, they’ll have plenty to read!
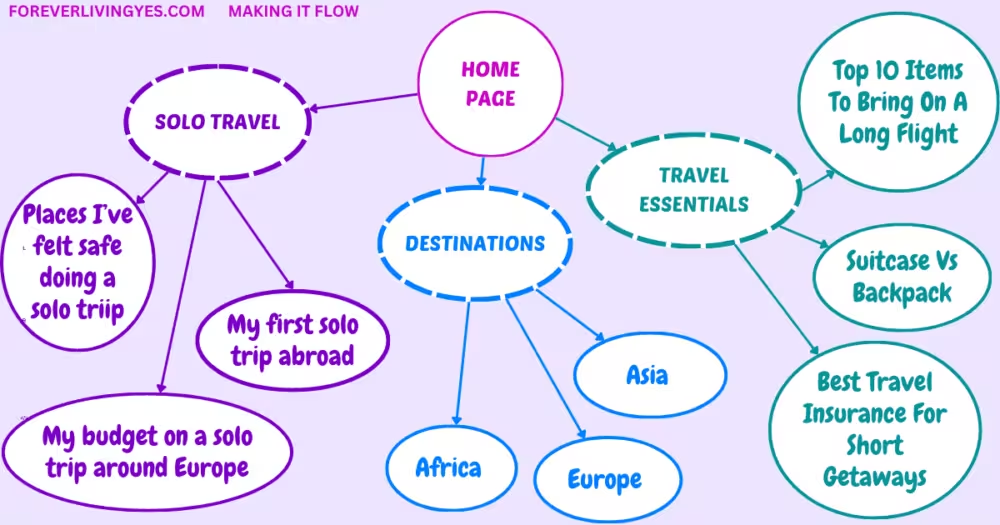
Example of making it flow. The idea is to focus on a keyword, e.g. Solo Travel, and have multiple relatable discussions around it
5. Take Pride In Your Visuals
First impressions are everything, so make it count. Everyone loves eye-catching visuals, especially on social media. It’s so important to provide great content and visuals on your website. The key? Use high-quality images and stunning graphics for each blog post you share. If you’re struggling to find good content from your own albums, sites like Adobe Stock have a huge selection of images you can use.
Have your visuals fit into your brand and personality and make it consistent throughout your website. Your visuals will help your content stand out and get noticed! For example, my visuals are bright and colourful, with the main theme of pink and blue running throughout. I like to add colourful bits wherever I can and choose visuals that pop and are inviting. Canva is my go-to for all things creative! It’s packed with templates and easy to use, making it perfect for designing all my visual content. Plus, it’s free—what’s not to love?
6. Social Media
Although SEO alone can be effective, social media can be hugely helpful. After all, why wouldn’t you want to take advantage of it? It’s a free form of advertising! However, the important thing to know is that if you’re a one-woman/one-man band, trying to do everything yourself is exhausting. Trust me, I’m speaking from experience.
First, you’ll have to pick and prioritize which platforms your audience is on. Then, decide what platforms to dedicate your time and energy to. Otherwise, spreading yourself thinly across all social media platforms will show.
CHOOSING PLATFORMS
There are many platforms you can choose from when deciding what one to use. It helps to look at other inspiring creators in your industry and see what platforms work for them, as you know it can also work for you.
When I first started, I wanted to be on Instagram, Facebook, Snapchat, Pinterest, TikTok, YouTube, Twitter X, and every other platform. As I started creating accounts, I suffered from burnout before I had even started! The key is picking a few and building on them. I stripped it right back and focused solely on Instagram, as I was already familiar with it. My audience is on that platform, and I was more comfortable putting my efforts into this platform.
In the meantime, I started learning about TikTok and Pinterest to prepare myself for when I could expand onto those platforms properly. Add another social media if you find yourself in the swing of things and have extra time. If you don’t have the time but really want to expand, hire a freelancer on Fiverr to help you. Just figure out what platform is best for you and your audience and start from there.
Read more: 10 Steps To Becoming More Productive
FINALLY, REAL TALK
Don’t Be Fooled…There’s More Than What Meets The Eye!
While starting a blog is considered easy (as in anyone can make one), a successful blog requires countless hours of (90% unpaid) work, creativity, and, above all, the determination to build and sustain a brand. Time allows you to grow with blogging, so I wouldn’t recommend getting your hopes up if you only have 10 hours a week to work on it – not in the early stages anyways.
While travel blogging might seem like a dream vacation, you typically aren’t seeing the insane amount of work that goes into writing, creating content, shooting photos, editing videos, and sharing to social media. Above all, it’s not an overnight success.
I worked on building Forever Living Yes on and off for nearly two years before making it public in January 2024. Since launching, I have worked on my site seriously for around five months. I finally made my first commissions recently and am constantly learning new ways to improve my blog. My journey has only truly just begun. Are you willing to put in the work?
TRUE SUCCESS
To ultimately be a successful blogger, you’ve got to love what you do; you have to start with pure intentions and the motivation to share your passion with others. This isn’t like a typical job where you can push through for a paycheck. In blogging and most entrepreneurial pursuits, passion is critical. You don’t need to love being a banker to get up and go to work in the morning – maybe the salary makes it worth it. But with blogging, enjoying most aspects of the workload is crucial. It’s what will keep you going through those inevitable periods of burnout.
You might not believe it, but being on social media isn’t my favourite thing. Replying to messages and posting daily on Instagram stories are some of my biggest challenges, which can be overwhelming. Fighting against wanting to spend less time on social media but wanting to build a fantastic community around females and solo travellers is a common challenge among creatives. However, through my love of travel helping others live their best YES is enough to keep me going and outweighs all the challenges.
With or without an audience, travelling and creating posts would still be my thing because that’s my passion. So really think about it, are you passionate about it enough to invest your time into this adventure? If you answered NO, then good for you for recognising, this is not the journey for you. If you answered YES, then I’m rooting for you! You’ve got this! Check out my other resources to help you along your journey. Good luck. <3
